
El multimeter, polymer o tests It is a very useful tool for many auto mechanic jobs. Without going any further, it is what is used to know if a battery is in good condition or if this or that element of the car receives current.
En Actualidad Motor You will find a large number of “do it yourself” style guides. Therefore, here we also explain how to use a multimeter, since it will be useful for you to go a little further in any check or repair what you want to do
Video on how to use a multimeter
Check car battery
We begin by reviewing a very frequent operation, either because the battery is approaching the end of life or for a long period with the car stopped. The battery discharges little by little, without the Alternator have a chance to upload it again.
As lead-acid batteries are very poor at discharging almost completely, they can become unusable. In the following video you can see how to check the battery with a multimeter:
As you can see, these are very simple and safe steps, as long as you follow them scrupulously. It is about measuring the battery voltage when it has been properly charged. Therefore, it is also explained how to check the alternator just before. This rules out that the problem is that it is not capable of charging the battery.
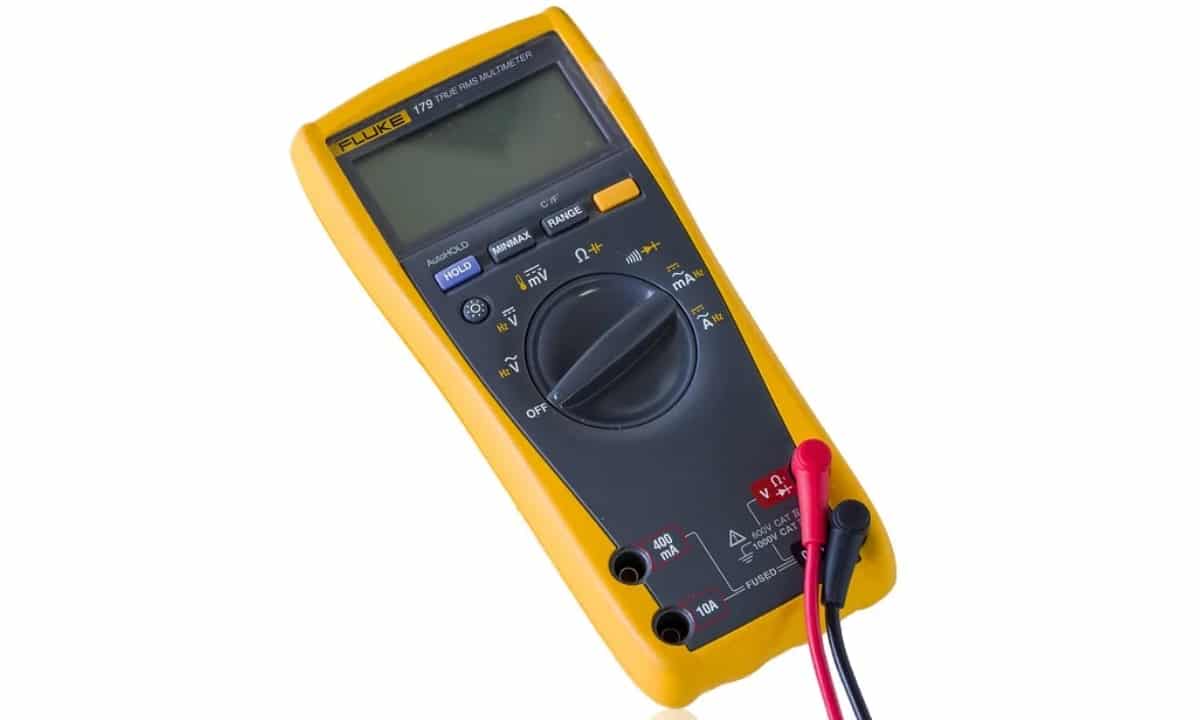
We also tell you in writing how to check it yourself with a multimeter. It is a very cheap device and the steps to follow are very easy:
- The first thing you have to do is prepare the multimeter for this specific operation:
• Select the measurement range in 20V DC. On multimeters, this type of current is usually indicated by the letter V, followed by a long line with a dashed line below it. Also with the letters DCV, which mean Direct Current Voltage.
• You will see that the multimeter has several connections where to insert the cables. To check the car battery, you must put the black cable in the common hole (COM) And the red wire into the volts (V) hole. In our voltmeter it is indicated VOHz, that is, the one used to measure voltage, resistance or currents. Although they can be grouped in other ways. The important thing for you is that you put V. - Now it's time to prepare the vehicle because the battery must be charged to see its real state. Otherwise it might look like it's messed up, when it's only partially discharged. To do this, you have to go around with the car for about 20 minutes. To be on the safe side, the best you can do is bring a constant speed to around 2.000 or 2.500 rpm.
- Something that many people tend to forget is that you have to discharge the battery a little before the measurement. You can wait about an hour, but if you don't want to take that long, turning on the lights for a minute or two with the engine off is enough. This eliminates the erroneous results of the test that you are going to do next.

- Turn off any device that you turned on in the vehicle during the previous step. Open the hood and discover the battery.
- Now it's time to start using the multimeter. put the alligator clips or test leads in contact with the terminals of the battery. As always, respecting the poles: black is negative and must go to the negative terminal and red, which is positive, must go to the positive terminal of the battery. Warning: make sure that they completely touch the metal. If there is dirt or the terminals have been sulphated, the measurement may not be correct.
- A value will appear on the voltmeter screen that is what helps you to know the status of the battery:

- If the battery is in good condition, should go out between 12V and 13V. Although it will only be in perfect condition if it is closer to 13 V.
- when it's over losing operability, the number will get very close to 12V.
- yes mark less than 12V, the state of the battery is already beginning to be bad.
- In the event that ya approaches 10V, it means that the battery is in very bad conditions and most likely you will have to change it.
If you want to delve into the subject, you can take a look at the following article:

How to use a multimeter to measure voltage (V)

The truth is that a multimeter is not only used to check the status of a battery. It is also key to locating faults, as long as they are related to electricity. The measurement of the voltage of an electric current is made, for example, when the fuel gauge doesn't work when the horn is broken or even in problems that affect the operation of the engine such as the MAF sensor measure wrong.
To measure current voltage with a multimeter you have to follow a few steps very similar to battery check.
- Configure the tester correctly. That is, you must take into account if it works with direct or alternating current and what voltage is expected. If you are going to measure, for example, the current that reaches the car horn, it is normal for it to be direct current and 12 V. So you must configure it in the 20 V position of the area marked with the letter V followed by a long line with another flashing below (or DCV). If you are going to measure the alternating current that feeds the lighting system, for example, you must place the multimeter in the area marked with the letter V∼. Although it can also be indicated with the acronym ACV, which stands for Alternate Current Voltage.
- Then you must place the terminals, tips or clamps of your multimeter in such a way that they touch the wires that should have current. For example, the wires leading to a car horn or the tabs on a light bulb socket (headlight problems).
Always respecting the positive and negative polarity, although on many occasions you will only find the positive cable and the negative or neutral is the sheet metal of the car. In the event that it needs activation, do not forget to turn on said device. For example, press the horn button to see if there is voltage. - Once this is done, you will be able to see if it receives electricity or not to the element of the car in question, because a value will appear on the screen. Also, since you are using a multimeter, you will be able to know the intensity of the current that reaches it. If it is less or more than indicated, you already know why said device works incorrectly.
How to use a multimeter to measure intensity (A)
As its name suggests, the multimeter can be used to measure various electrical quantities. In other words, in addition to being a voltmeter (previous case), it can also work as an ammeter, to measure current intensity. This is done, for example, to check if a vehicle has abnormal electrical consumption. To measure intensity, the steps are somewhat different:
- Set up the multimeter. Choose direct or alternating current and the expected amperage (A). If you are going to measure, for example, an abnormal electrical consumption of the battery when the car is off, it is direct current and 10 A (Amps). Depending on the multimeter, this value can be 20 A, 30 A, 40 A, etc. 5 A or less may be too little. The black cable goes to the COM port and the red cable must go to the port of the multimeter that indicates this value. It is not enough just to select the appropriate mode on the screen or selection wheel. For example, in the multimeter in the image above it would be the one that says 10 A.
- Then you must place the terminals, tips or clamps of your multimeter in such a way that they touch the wires that should have current. However, unlike with voltage (V), with current (A) it is necessary to open the circuit to obtain a correct value. For example, in the same example of checking electrical consumption, you have to disconnect the negative cable from the car battery and put a clamp or tip on the terminal and the other on the loose cable. This forces the current to pass through the multimeter so that it can measure well.
- Once this is done, you will be able to see how much current intensity passes for said electrical circuit. In the next video We show you how to check abnormal electrical consumption, so that you have a good example of how to use the multimeter to measure amps:
How to use a multimeter to measure resistance (Ω)
Resistance measurement is also an element Useful for car breakdown repairs or other electrical work. A good example of this is checking the ignition coil. Its resistance usually varies from 3 to 5 ohms, for ignitions that use a breaker, and from 0,3 to 1 ohm, for electronic ignition coils. Values outside these ranges would indicate a fault.
The steps to use a multimeter to measure electrical resistance are:
- As always, you must configure the multimeter for the operation you are doing. In this particular case, you must select one of the values in the resistance zone, which is indicated with the uppercase Greek letter omega (Ω). Each operation will have its appropriate value, but going back to the example of checking the coil: you must select 200 Ohms. As we have told you before, the values that they will give you are very low and you must select the smallest range.
- place the wire black in the common connection (COM) which is also black and the cable Red in which it puts VOHz (red).
- Once done, you must place the clamps or test leads of the multimeter where it is required: leads, the appropriate tabs of a coil, etc.
- At that moment will give you the electrical resistance of the conductors carrying the charge. So wherever you place them, it will give you a value that must be within acceptable parameters. For example, 0,3 to 1 ohms from the ignition coil, or if you're measuring the resistance of a wiring harness, it should be around 0,01 ohms.

How to use the multimeter to measure continuity
This function of the multimeter is very useful to detect fuses cast, cut coils, fused heaters, etc. In short, it is a measurement to know if the connections of an electrical circuit are interrupted. Important notice: never use it on live circuits, because you can damage the multimeter. That is, never in batteries, generators, charged capacitors, wiring where there is voltage, etc.
To check continuity you just need to follow the Next steps:
- Properly set up the multimeter: Selects the continuity function, which is usually indicated by a speaker symbol or an arrow with a vertical line at the end.
- place the wire black in the common connection (COM) and wire Red in connection VOHz.
- Make sure that you are not going to perform this test on anything that has voltage.
- Place the clips or tips in contact with the circuit, metal tabs or any terminal on which you want to do the test. If there is continuity a beep will sound, if not the meter will remain silent. Notice: if the resistance is high (above 30 Ohms) it will not beep either.
In the next video you can see how the multimeter reacts when it detects continuity and when it does not detect it or there is too much resistance:
How to use digital and analog multimeters
As you may have seen, both in checking the battery status and in others related to current, we have mentioned the multimeter screen. What it means is in digital. In them you simply select the mode you want to choose and the numbers appear indicating the appropriate value.
You will see that in most of these multimeters, multimeters or testers, the selection is made by means of a rotary knob. However, it is not always that simple. There are those in which you have to enter the configuration menu or Mode and select each of the parameters. In any case, the extra complication is minimal and you will be able to handle it without problems following the instructions. The important thing is that you know what each option is for.
In the case of analog multimeters, the selection will always be with the rotary knob. Its little peculiarity is that it only has one needle that marks a certain level and a bunch of different scales behind it. To avoid mistakes, make sure you are looking at the right scale at all times. Put another way, if you're checking the resistance marked with the Greek letter Ω in the 200 range, don't get confused and look at Voltage (V).

How to know which number to choose
Knowing how to choose Voltage, Resistance, Amps, Continuity, etc, you have half the job done. However, you must also know what value to choose from these options. The answer is the smallest number that exceeds the expected value. For example: if we expect around 12 V from the battery, we must choose 20 V, which is the lowest option that exceeds 12 V.
If we choose an option that is below expected value, the multimeter will not report any data on the screen. For example, if we choose 200 V on the rotary knob or on the screen, but we are going to measure in a 240 V domestic plug, the multimeter will not be able to measure what we are giving it.
If we choose an option too big for what we are going to measure, the multimeter will measure poorly or even offer no data, depending on what we have chosen.
Alligator clip or test lead multimeters
If your multimeter has both options, all the better.. The tweezers are more suitable for checks such as the car battery, simply for the comfort that they stay fixed. Although you can also use typical test leads that have some sharp metal spikes. The only difference would be that you would have to support the multimeter somewhere in the engine compartment and put these tips in contact with the terminals with both hands.
You must choose a suitable multimeter according to the checks that you are going to do to the car. If the check is in a very narrow space, like a relay slot, tweezers won't do you any good because they won't fit. For those operations there are the test cables, for which there are even tips of different thicknesses.
Images 1, 3, 5 and 6 – Gareth Halfacree, Paul Schultz, Sebastian Włoszek, Arthur Becker Simões